Preliminary
I drove down to the HPBA show in Atlanta in March 2008, and had a close look at the various pellet stoves in the outdoor burn area. Lopez Labs partner Jerry Frisch also attended the show, and I discussed the project with him. In 1992, I had seen a pellet conversion on a heater in Jerry's basement in Everett, WA. It was a retrofit kit designed for wood furnaces, known as a "Collins Hopper 4000". Jerry said he was no longer using the hardware, and generously offered to ship it to me.
Online
Pellet Basket retrofit for a fireplace
This is a simple retrofit that allows you to burn a load of pellets in batch mode. It would be an obvious option to evaluate for a masonry heater, since it is simple.
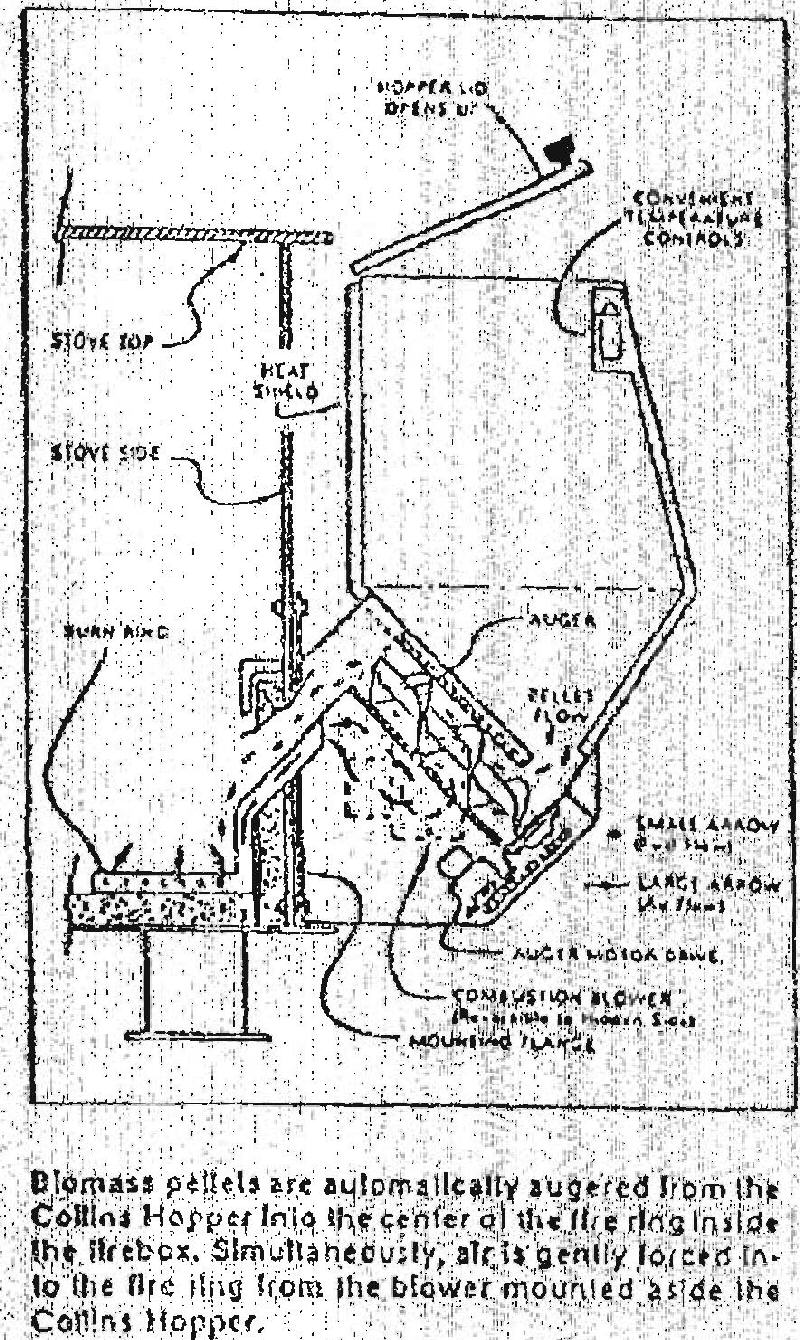
Shown above is a schematic of how a typical continuous-burn pellet stove works.
A small auger moves the pellets from a supply hopper to a "burn pot".
Forced air is blown onto the pellets to combust them.
In addition, there is often an ignition mechanism (not shown).
The Collins Hopper:
Pellets can be burned either in batch mode in a basket, or continuously in a burn pot. The Collins Hopper
was an example of a continous burn system:
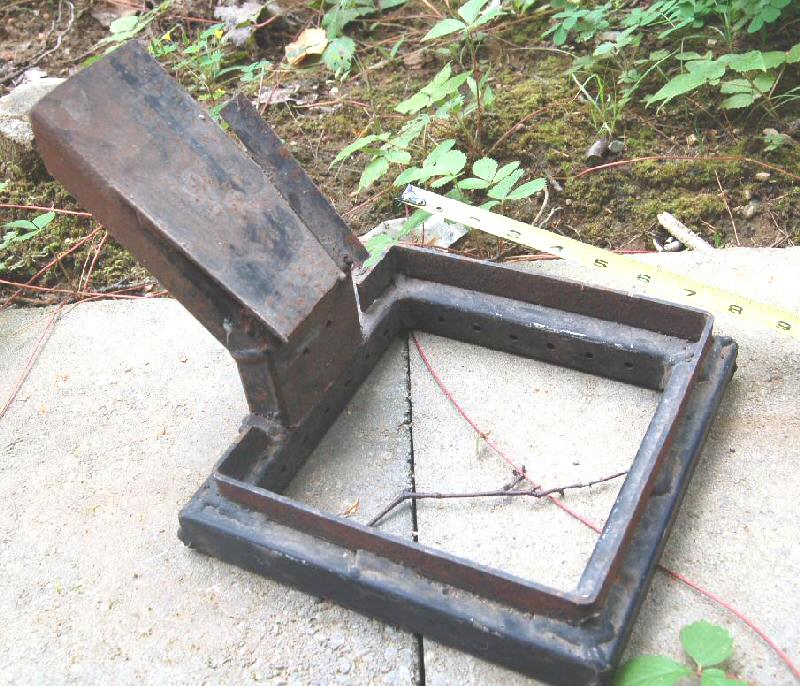
This is a photo of the Collins burn ring. Forced air comes through the 1"x4" steel tube at the left, into the 1"x1" square tubing ring, through a series of
1/8" holes. A lip is welded to the top to retain the pellets in the ring.
Pellets, metered by an auger, drop by gravity through a separate 2"x4" tube, and hit the guide chute shown near the bottom of the 1"x4" air tube.
Other Research

Alex Chernov sent in this image from the Austrian stove show that he attended last year.
It is the firebox of a pellet burning Kachelofen.
The stove fires in batch mode. A hopper is loaded through a gasketed fueling door, and the
pellets drop down behind the large ceramic baffle into the burn pot/basket. The burn pot
operates with natural draft. The ceramic baffle is air cooled, to prevent the fire from going
up into the pellet charge. (see illustration, below).
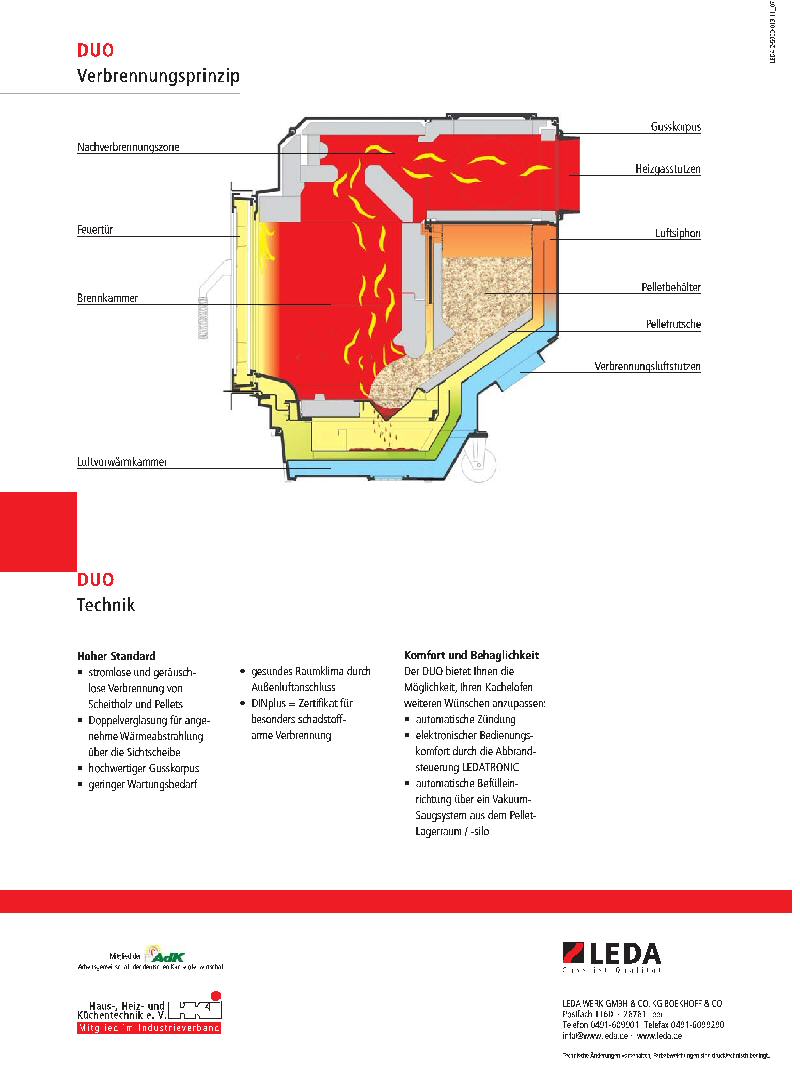
Brochure from LEDA in Germany.
Compare with Alex's photo
Patents
A patent search turned up a few that were interesting.
More details
Miscellaneous Research
Page of interesting images of pellet burn pots, etc.
Implementation:
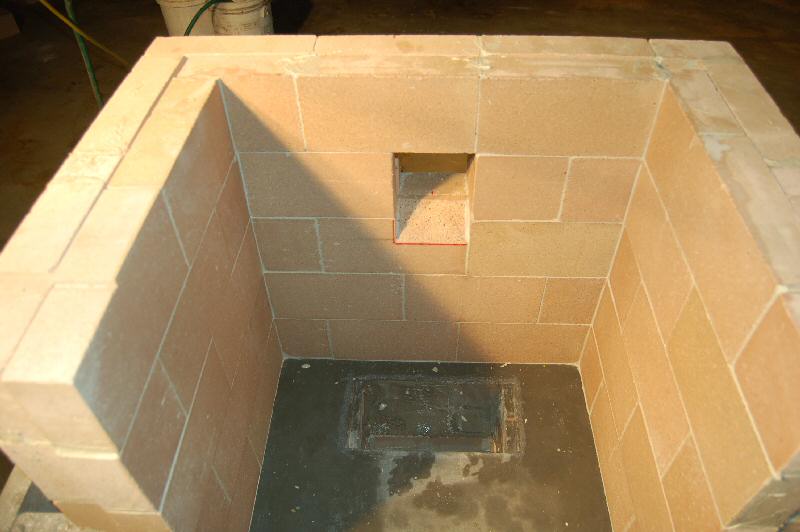
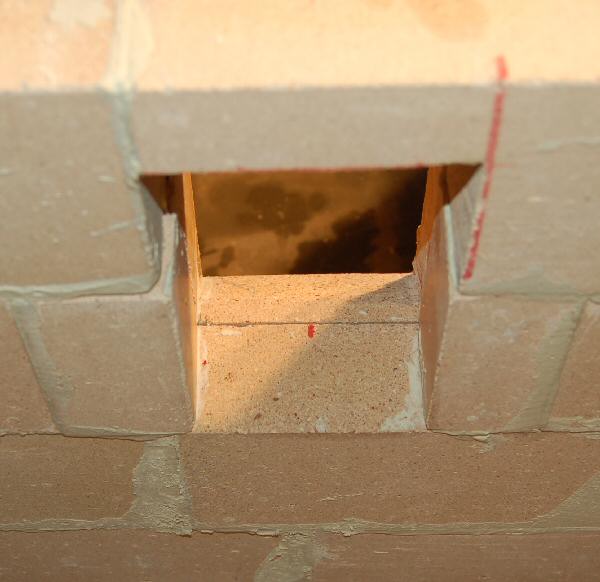
An angled opening in the rear wall allows for installation of a Collins type burn pot with pressurized air supply tube and pellet feed tube.
Visible at the back of the floor is one of the two air inlets that are standard on the current Heat-Kit
(see http://heatkit.com/html/lopezm.htm )
This is normally
occupied by a secondary air grate.
Everything is raised off the floor 8", to allow for a batch burn basket scheme as well.
The preferred scheme is a large basket with an enhanced burn rate (in batch mode) to be fed from a hopper behind the stove.
Rear view.
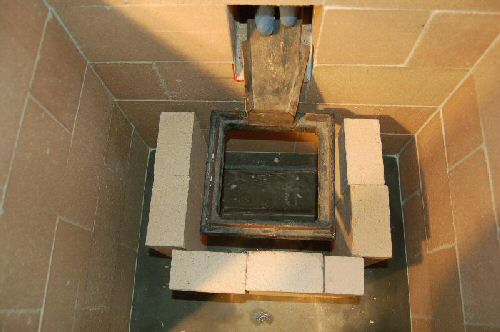
Collins burn pot.
If a batch basket of the same size were used instead, the loose firebricks could be arranged as shown to form an air supply plenum around the basket.
If the plenum columns are capped at the top, chimney draft will force the air through the basket.
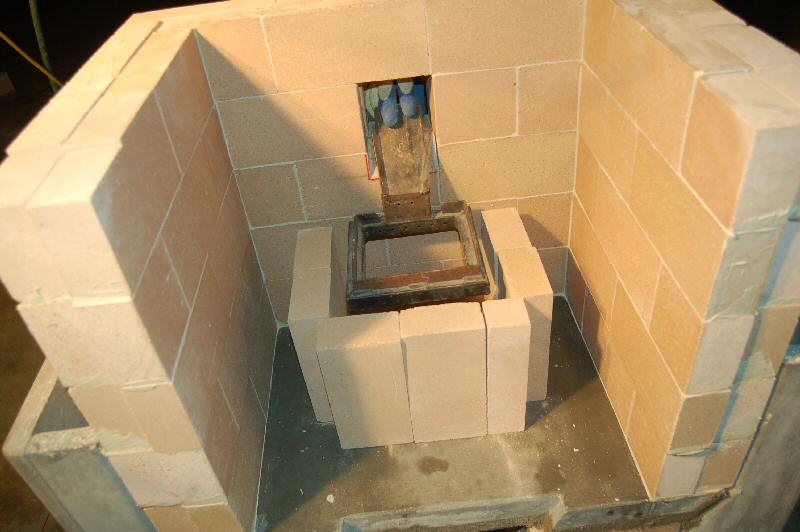
The client's plan at this stage is to construct an experimental basket from wire mesh, and try out the above configuration.
The basket will be larger than shown, eliminating the loose firebricks on the sides, and using the firebox walls to create the air plenum.
Future results will be reported on this page.
If you have any interesting material to add, please email me at mheat(at)heatkit.com
Update, January 30/09
Date: Fri, 30 Jan 2009
To: "Jeff Packard" <packardj(at)telusplanet.net>
From: Norbert Senf <mheat(at)heatkit.com>
Subject: Re: Packard masonry heater - the pellet story continues
At 07:58 PM 1/26/2009 -0700, Jeff wrote:
(snip)
Progress on the pellet front.
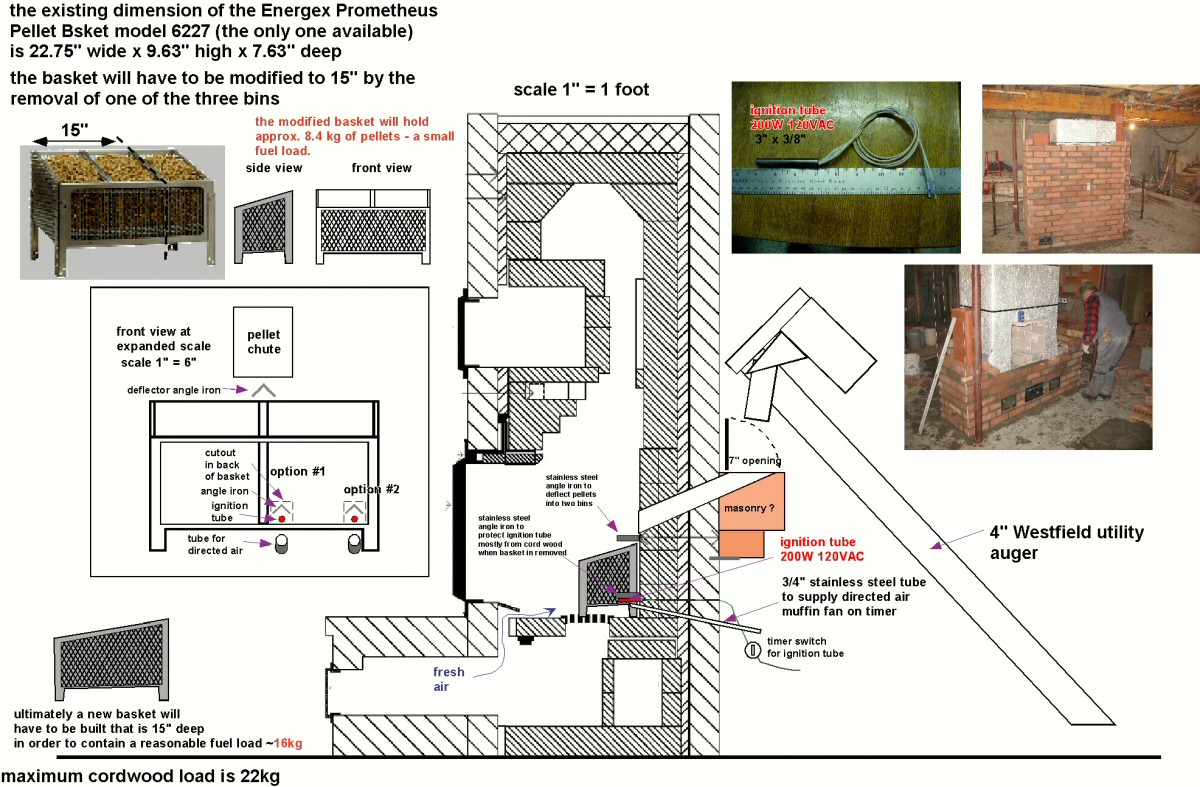
1) I have ordered the Prometheus basket from Energex. The only model they
have available is their 6227 which is 22.75" wide and obviously won't fit in
the firebox. I plan to cut it down to a two-bin model which will be 15"
wide. At those dimensions it will only hold 8.4 kg of pellets, hardly a
large fuel load, but perhaps for the initial experiments, good enough.
Arguably the pellets at 4.5% moisture could burn too hot for the heater
anyway and a smaller load is perhaps best in that regard.
OK. Better to start small.
2) I have purchased an ignition tube from Traeger, who make a wood pellet
BBQ. Their tube is designed to be in direct contact with the pellets. It is
200W 120 VAC resistor element, and measures 3" long and is 3/8" in diameter.
Apparently the tube will ignite the pellets in about 4 to 5 minutes from
being turned on, however I am very suspicious that some directed air will be
required to truly get a burn going. Virtually all the burn pots on pellet
stoves do have some forced air flow into the pot.
3) Please examine my latest schematic and let me know what you think about
the proposed layout. In particular I'd like you to give some thoughts to a)
the placement of the ignition tube (near centre or at one side), either way
it can't be buried deeply in the pellets,
I'd guess the sides, to allow maximum air circulation. The grate will be close
by, and there will be a low velocity air stream from it, particularly if the
heater is not cold. If the heater has been fired in the previous 48 hours, it
will have some residual heat that will power up the chimney after the chimney
damper is opened. In other words, if you open the chimney damper and wait
5 to 10 minutes, you'll get a rise in stack temperature, and greater initial
draft.
b) how do we extend the pellet chute out the back of the masonry
to accomodate a horizontal chute opening (7 x 7" ??)
and corresponding small friction-fit cast iron door,
I think that the masonry cutout in the core was sized to take a 2"x4" steel
tube, which is what the Collins pellet retrofit uses. So, you could take a
2x4 tube and weld a metal box to the top of it.
c) what diameter and what sort of stainless steel, should we make
the directed air tube out of.
316 ss, 3/8", maybe 1/2" (just a guess). I'd try it with the grate air
first, to see if the forced air is necessary.
d) I would like to monitor firebox temperatures as we do test burns with
different loads. What would you recommend as a (digital) remote-read
thermometer. Would a high end kitchen oven probe work? Not sure what their
upper end in temperatures might be. I'm sure you use an industrial model.
Regardless of make, where would you suggest the probe itself be placed in
the firebox and if you favour a permanent installation, how might that be
installed?
If you want to monitor instantaneous, high temperatures, you need a thermocouple
in a ceramic well. A fun place to do that is the throat behind the oven.
A cheap way to do it is with a Canadian Tire digital multimeter, with thermocouple
input for about $50.00 (I've gotten them on sale for 29.99). The thermocouples
are arount $7.00). You'll likely find that it is fun at first, but quickly gets
boring.
If you just want to be able to compare one burn with another, you could just
monitor the heater surface temp at one location, and record where it peaks.
I use this setup:
http://heatkit.com/research/2009/lopezk-labjack.htm
Very nice, cheap datalogger with USB connection and software, and high accuracy
temperature probes, $25 - $50 each, depending on accuracy. They go to about 250F,
although they are advertised as 300F.
Best ....... Norbert
|